Biscoff Banana Muffins

What’s this? A new recipe? Can you believe your eyes?!

Yeah, here I am again. I have definitely fallen off the blogging train – if I’m honest, I just don’t have as many ideas for recipes as I used to. I think I have used them all up! Plus, it’s been nice cooking other people’s food this past year, not making my own up and writing it and photographing it.

But this week I had a few ingredients hanging around the kitchen, and I thought…why not write it all down? So, here you go.

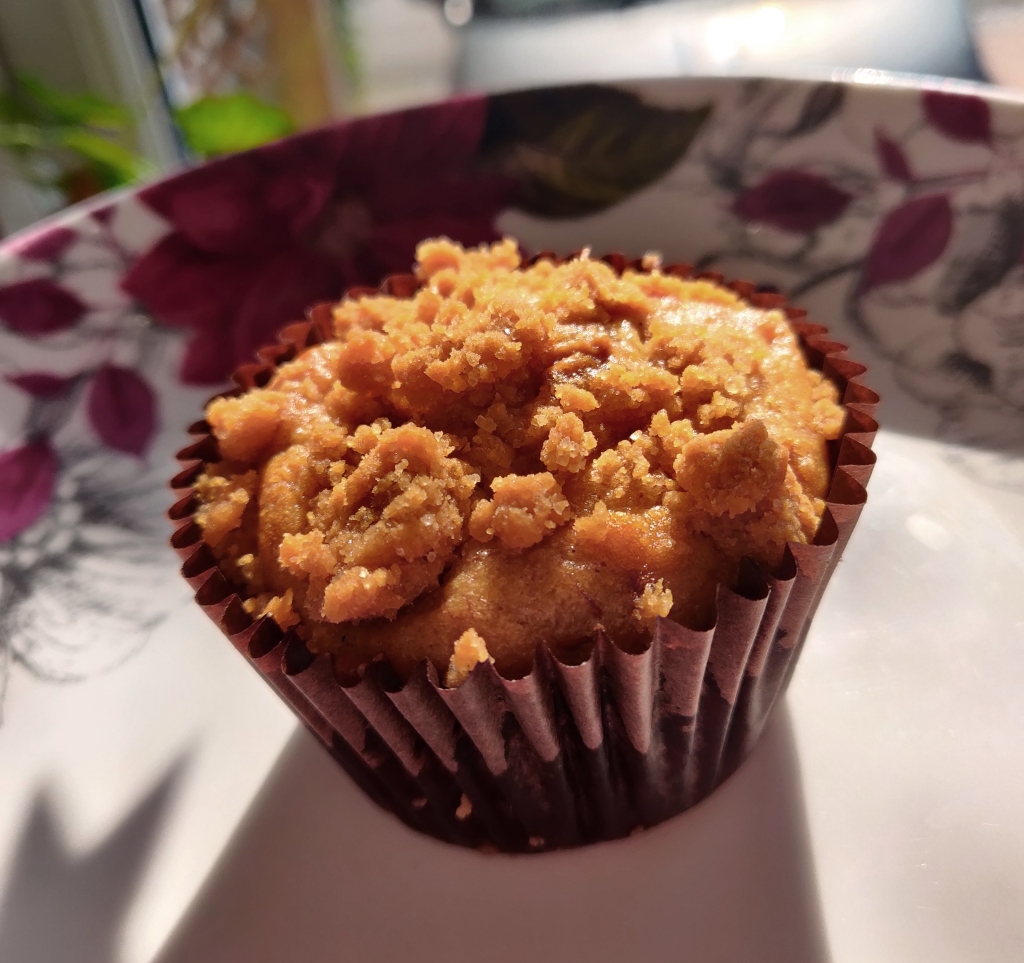
These muffins are banana, but with a hidden filling (though the crumb on top gives it a way a bit!). They’re based on my chocolate crumbed banana muffin recipe but instead of chocolate, we use the magical biscoff spread. This may be sold as “speculoos” in your country, or even “cookie spread”. Go for the smooth variety for this recipe!

They’re pretty simple to make – as with all muffin recipes, you don’t want to overmix them, so use your hands and a spoon rather than your mixer. And, the recipe only makes six muffins, because I had only got two bananas – but feel free to double it to make twelve!

Biscoff Banana Muffins


Ingredients


– 2 very ripe bananas
– 50ml sunflower (or other neutral) oil
– 2 tbsp milk of choice (I used soy)
– 1 tsp apple cider vinegar
– 60g brown sugar
– 1 tsp vanilla extract
– 1 tsp baking powder
– 0.5 tsp bicarbonate of soda
– 1 tsp cinnamon
– 150g plain flour
– approximately 6 heaped teaspoons biscoff spread
for the crumb
– 2 tbsp biscoff spread
– 2 tbsp plain flour
– 2 tbsp granulated sugar

Directions


Preheat the oven to 175C/350F/Gas Mark 3
1. Begin by mashing the bananas in a large bowl until thoroughly mashed. You can use a fork or a potato masher for this!
2. Into the bananas, add the oil, milk, sugar, and vanilla, and mix well.
3. Sift in the flour, cinnamon, bicarbonate of soda, and baking powder.
4. Mix until just combined – don’t overmix!
5. Once mixed, scoop the batter into a lined muffin tin – fill each muffin case approximately half full. There should be leftover batter.
6. Add one heaped teaspoon of biscoff spread into the centre of each muffin case.
7. Fill the cases with the remaining muffin batter, they should end up about two thirds full.
8. Next, make the crumb. In a small bowl, add the biscoff spread, flour, and sugar, and rub together with your fingers until you get a sandy texture.
9. Generously sprinkle the crumb over the muffins in their cases.
10. Place the muffins – crumb and all – into your preheated oven, and bake for 20-25 minutes, until nicely golden brown.
11. Cool in the tin, and store in the refrigerator. 

White Chocolate Biscoff Cookies

When I first posted these on my instagram, everyone loved them! I promised that I would write up the recipe –  so here it is!

These cookies are white chocolate chip – but with a hidden surprise…

They’re stuffed with a biscoff spread filling!

The cookies themselves are pretty big, so make sure when you bake them you leave plenty of space on the tray for them – else you end up with several cookies stuck together.

White Chocolate Biscoff Cookies

  • Servings: 12 cookies
  • Print

Ingredients

    For the cookies
  • 100g vegan white chocolate chips (or chop up a white chocolate bar into chunks)
  • 140g vegan butter
  • 150g brown sugar
  • 100g white sugar
  • 1 tsp vanilla extract
  • 1 tbsp oil
  • 1 tsp baking powder
  • 2 tbsp water
  • 0.5 tsp bicarbonate of soda
  • 275g plain flour
  • For the filling

  • 125g biscuit spread
  • 40g icing sugar (powdered sugar)

Directions

    Preheat the oven to 175C/350F
  1. Begin by combining the butter, sugars, and vanilla in a bowl and mixing unitil smooth and creamy.
  2. Add the oil, baking powder, and water, and stir until combined.
  3. Mix in the bicarbonate of soda.
  4. Stir through the flour until a firm dough forms. Mix in the chocolate chips.
  5. In a separate bowl, mix together the biscuit spread and icing sugar until the mixture is able to be formed into balls with your hand.
  6. Form the cookie dough into twelve large cookie sized balls (or more/less if you would rather) and set them aside.
  7. Take one of the cookie dough balls, break it in half, and flatten each half slightly.
  8. Add a teaspoon sized amount of the biscoff mixture in the middle of one of the halves, and cover with the other half – making sure to seal well. Don’t worry about flattening the dough, it’ll do that in the oven.
  9. Repeat until all the cookie dough is used up.
  10. Place on a lined baking tray, and bake in the oven for 12-15 minutes until golden.
  11. Enjoy!

Biscoff Rocky Road – VeganMoFo 2019

Are you ready for a brand new recipe? Of course it’s a sweet one – I’m always on the lookout for new sweet recipe ideas! One of my favourite recipes to make is my rocky road, and so I decided to adapt it a bit and use another of my favourite flavours…Biscoff!

This bar has all the textures of a rocky road, but with the flavour of biscoff cookies and spread. If you can’t get biscoff spread, you can look and see if you can find other “biscuit spread” – it may be labelled as speculoos or just “spiced biscuit spread”, and check the ingredients to make sure it’s vegan. It’s delicious!

Biscoff Rocky Road

  • Servings: makes 28 squares
  • Print

Ingredients

  • 150g lotus biscuits
  • 100g rich tea (or other mild) biscuits
  • 300g vegan chocolate
  • 75g vegan butter
  • 200g biscoff cookie spread
  • 50g vegan mini marshmallows
  • To top
  • 100g biscoff cookie spread
  • 50g lotus biscuits
  • mini marshmallows

Directions

  1. In a food processor, blend the lotus biscuits and rich teas until they are mostly crumbs.
  2. In a heat proof bowl, combine the chocolate, butter, and cookie spread, and melt (either in the microwave or over a double boiler).
  3. Once melted, stir in the biscuit crumbs and mini marshmallows and mix until well combined.
  4. Press into a lined tin, making sure to compress it well so it doesn’t fall apart.
  5. Melt the remaining cookie spread (from the “to top” section) and drizzle over the large bar.
  6. Break up the biscuits and press on to the melted spread. Sprinkle the marshmallows on top.
  7. Place in the fridge and leave to set for at least 2 hours, until firm.
  8. Slice into bars. Store in the fridge.

Cherry and Almond Biscuits

What’s this? A blog post? Outside of VeganMoFo?! Yep, that’s right. I’m as shocked as you. I made these biscuits and thought, hey, why not blog them! They came about quite by accident – I made a Bakewell tart and had leftover glace cherries and ground almonds, and thought I’d use those Bakewell flavours and make biscuits!

They’re pretty simple to make, with ground almonds and almond extract in the dough giving it that Bakewell flavour, and chopped up glace cherries folded through. Glace cherries are a little sticky to chop, but they are worth it!

The dough can be made in advance – it needs to chill for at least an hour, but will be happy left overnight if you like! This means you can just bake them at your leisure and have freshly baked biscuits ready for you. These are perfect with a hot cup of tea.


Cherry & Almond Biscuits

  • Servings: 20 biscuits
  • Print

Ingredients

  • 125g vegan butter
  • 150g white sugar
  • 50g brown sugar
  • 1 tsp almond extract
  • 50g ground almonds
  • 1 tbsp non-dairy milk
  • 250g plain flour
  • 1 tsp baking powder
  • 100g glace cherries, roughly chopped

Directions

  1. Begin by creaming the butter and sugars in a bowl until light and fluffy.
  2. Add in the almond extract, ground almonds, and milk, and mix well.
  3. Stir through the flour and baking powder to form a dough.
  4. Gently fold in the chopped cherries, making sure to distribute them evenly through the dough.
  5. Place in the fridge for at least an hour to chill.
  6. Preheat the oven to 180C/355F
  7. Roll the dough into small balls and place on a baking sheet, giving room for expansion.
  8. Place in the preheated oven for 10-12 minutes, until the cookies are golden at the edges.
  9. Leave to cool on the baking tray, then eat!


Marshmallow Fluff Brownies – VeganMoFo Day 22

So, today’s VeganMoFo is about Fancy, but Frugal. I don’t actually do a whole ton of “fancy” food – you know, haute cuisine, giant plates with teeny portions of food, exotic ingredients – most of my savoury food is firmly in the home cooking, comfort food genre. If you want something fancy from me, it’s going to be a dessert. And so, I made brownies.

This may be my fourth brownie recipe on this blog, but it’s SO worth it. It uses pretty much the base recipe from my fudgy brownies, but it’s topped with marshmallow! Vegan marshmallows are, as you probably know, a bit expensive, but this isn’t! It’s made using aquafaba, which you use in the brownies anyway, and you probably have leftover from chickpeas.

The brownies end up topped with a fluffy, gooey, sweet cloud of marshmallow fluff that’s toasted lightly under the grill (or, broiler to some – apparently they’re the same thing) to give it a caramelised top. When I say lightly, I mean it – sugar caramelises very quickly so you have to keep an eye on it to make sure it doesn’t burn, burnt sugar is nasty.

The marshmallow fluff is based on what I used for these hot chocolate cupcakes, though you make less fluff (the perfect amount to cover the brownies!). It has xanthan gum in, which is necessary as it gives the fluff that gooey, slightly stretchy texture that marshmallow fluff has, but also more importantly stops the fluff from losing its shape – if you don’t put it in, it’ll look fine for a little, but disintegrate very shortly, which is very sad. You only need a small amount of xanthan gum, and it lasts forever, so it’s a good investment, and it means you can always whip up fluff when you like! (it goes great on hot chocolate).

Marshmallow Fluff Brownies

  • Servings: 25 brownies
  • Print

Ingredients

    For the Brownies
  • 115g vegan dark chocolate, broken in to pieces
  • 50g cocoa powder
  • 90g vegan butter
  • 1 tsp vanilla extract
  • 1/2 tsp salt
  • 1/2 tsp bicarbonate of soda
  • 1/2 tsp baking powder
  • 4 tbsp aquafaba
  • 360g white sugar
  • 50ml milk of choice
  • 300g plain flour
  • 100g chocolate chips
  • For the Fluff
  • 100ml aquafaba
  • 1/4 tsp cream of tartar
  • 1 tsp vanilla extract
  • 200g icing sugar
  • 1/2 tsp xanthan gum

Directions

    Preheat the oven to 175C/350F
  1. Begin by placing the chocolate, cocoa powder, and butter in a heat proof bowl and melting (I do this in the microwave, but a double boiler is fine too!).
  2. Once melted, add the vanilla, salt, bicarb, baking powder, aquafaba, and milk, and stir until combined.
  3. Whisk in the sugar well.
  4. Fold through the flour and chocolate chips.
  5. Press the brownie mixture into a lined tin – it’ll be quite thick, but that’s a good thing!
  6. Bake in the preheated oven for 30-35 minutes, until a knife inserted comes out clean.
  7. Leave the brownies to cool completely before making the topping.
  8. To make the topping, begin by placing the aquafaba in a very clean bowl (important – if it’s at all greasy it won’t whip!).
  9. Set aside 50g of the icing sugar, and add the xanthan gum to it, and mix well.
  10. To the aquafaba, add the vanilla extract and cream of tartar.
  11. Whisk the aquafaba with an electric mixer until it forms stiff peaks – up to ten minutes.
  12. Now, with the mixer running, add the plain icing sugar a spoonful at a time, allowing it to combine.
  13. Once the plain icing sugar is added, add the xanthan gum mixture a spoonful at a time, with the mixer still running.
  14. Once thoroughly combined, your fluff is done! Spread it evenly over your brownies.
  15. Preheat your grill (or broiler).
  16. Place the fluff topped brownies under the grill, and grill until turning brown on top (watch carefully, as they can turn very quickly!).
  17. Leave to cool, and then slice into individual brownies.

Chocolate Chip Banana Bread – VeganMoFo Day 17

Carrying on with the budget theme for VeganMoFo, today we’re all about “Super Cheap Sweets”. Now, anyone who knows me will know I never skip the sweet food (OK, I’d eat sweet over savoury if I had to pick) but if you’re buying fancy vegan cakes and chocolates, it can get more expensive. Thankfully, it’s easy to make cheap and tasty sweets by yourself, like this banana bread!

banana1

Bananas are a great fruit to bake with cheaply, because the older they get, the better they are for baking – and the cheaper they are! To make banana bread, you want bananas with plenty of brown spots, and I often find these discounted in supermarkets. Using bananas, you don’t need anything like eggs in baking, which makes it even cheaper (and of course vegan).

Chocolate chips added to banana bread make it even tastier, but you could sub them out for any add ins you like – walnuts are nice, or dried fruit if you like it! Just check your chocolate chips for milk ingredients before you use them.

Chocolate Chip Banana Bread


Ingredients

  • 4 medium bananas, mashed
  • 225g plain flour
  • 1 tsp baking powder
  • large pinch salt
  • 110g sugar
  • 1 tsp vanilla extract
  • 75ml sunflower oil
  • 100g chocolate chips

Directions

    Preheat the oven to 170C/340F
  1. Begin by mixing the mashed bananas, sugar, salt, oil, and vanilla extract in a large bowl.
  2. Stir in the flour and baking powder to form a smooth batter.
  3. Add the chocolate chips and mix.
  4. Pour into a lined loaf tin.
  5. Bake in the preheated oven for 50-60 minutes, until a knife inserted in the middle comes out clean.
  6. Leave to cool in the tin (or eat warm!).

Low FODMAP chocolate biscuits – VeganMoFo Day 15

Have you ever heard of the low-FODMAP diet? It’s an elimination diet mostly aimed at IBS sufferers, but can also be used for other chronic conditions. FODMAPs (Fermentable Oligo-saccharides Di-saccharides Mono-saccharides and Polyols) are carbohydrates that have been found to contribute to irritation in the gut in some people – basically, they’re things that people with IBS are often intolerant to. The low-FODMAP diet gets you to eliminate all FODMAPs for a certain period of time, and then slowly reintroduce them, one at a time, so you can figure out what your body can handle. It is a really boring elimination diet – I’ve been on it myself and it wasn’t fun! Here is a list of high, and low FODMAP foods. For today’s VeganMoFo, I made chocolate biscuits that are acceptable on a low FODMAP diet!

fodmap1

These biscuits are made with oats, rather than wheat flour, as wheat is a high fodmap food. If you use certified gluten free oats and baking powder, these biscuits are also gluten free. I used vitalite vegan butter for these, which I believe is low Fodmap, but around the world vegan butters may vary!

Low FODMAP Chocolate Biscuits


Ingredients

  • 250g oats
  • 100g vegan butter (i used vitalite), melted
  • 60g golden syrup
  • 1 tsp vanilla extract
  • 100g white sugar
  • 30g cocoa powder
  • 1 tsp baking powder
  • 1/2 tsp bicarbonate of soda

Directions

  1. Begin by pulsing the oats in a food processor until they are finely milled and flour-like.
  2. Meanwhile, mix the melted butter, golden syrup, vanilla extract, and sugar together in a large bowl until well combined.
  3. Stir through the oat flour, cocoa powder, baking powder, and bicarbonate of soda.
  4. Place in the fridge for half an hour at least (you can make the dough a day in advance if you prefer).
  5. Preheat the oven to 180C/355F
  6. Take the dough out of the fridge and form into walnut size balls. Place on a lined baking tray and flatten slightly.
  7. Bake in the preheated oven for 10-12 minutes, until they’re a little browner.
  8. Leave to cool on the baking tray.


Chocolate chip cookies (vegan & gluten free) – VeganMoFo Day 10

I’ve posted a lot of chocolate chip cookie recipes already. Ok, maybe just one or two, but still. How many cookie recipes does a girl need? The answer is most likely, an infinite amount.

These cookies are slightly different though, as for VeganMoFo 18 day 10 we’re going gluten free! As always with making allergen free food you need to check with the person you’re making it for about what they can/can’t eat, and what level of cross contamination is ok for them – I’d classify these cookies as having “no gluten ingredients” because my kitchen is full of wheat products so I can’t guarantee them to be 100% gluten free, but if you made them somewhere without that, they would be!

I wanted to show how easy it is to make tasty gluten free food. I have eaten gluten free in the past when doing elimination diets for my stomach issues and I found that often, gluten free ready made flour works really well in recipes you already have! For this, I used Lidl’s own gluten free self raising blend, which is one of the cheapest, but any pre-made self raising flour would work.

The recipe is mostly based off my regular cookie recipe and it works pretty much the same, although I find the gluten free cookies have to bake a few minutes longer than my usual ones. They are so good that my husband even specifically requests them!

Gluten Free Chocolate Chip Cookies


Ingredients


– 130g vegan butter
– 80g brown sugar
– 80g white sugar
– 1 tsp vanilla extract
– 1 tbsp golden syrup
– 250g gluten free self raising flour
– 100g dark chocolate chips

Directions


Preheat the oven to 175C/350F
1. Begin by creaming the butter and sugars together until light and fluffy.
2. Next, add the vanilla and golden syrup and mix thoroughly.
3. Stir through the flour to form a stiff dough.
4. Finally, mix in the chocolate chips.
5. Place walnut size balls of cookie dough on a lined baking sheet, leaving space for them to rise.
6. Place in the preheated oven for 15 minutes, until golden brown.
7. Leave to cool on tray.

Simple Baked Flatbread – VeganMoFo Day 4

Today’s prompt, carrying on with the “inspired by…” theme, is about art, and how art inspires you. “Art” can encompass so much, but for this purpose I’m applying it to music, specifically the song “North” by Sleeping at Last.

Let the years we’re here be kind, be kind.
Let our hearts, like doors, open wide, open wide.
Settle our bones like wood over time, over time.
Give us bread, give us salt, give us wine.

The song is about homemaking and finding a place to call home. About finding somewhere full of peace, love, and of course some good bread. So what did I do? Made bread, simple but delicious.

rusticbread2

A lot of flatbreads either require rising time, or want to be pan fried…these need neither, they come together really quickly and they bake in the oven in just ten minutes! Which makes them really easy to just whip up to go with soup, stew, or anything you want. They’re best eaten fresh on the day of baking, but will keep for a couple of days afterwards.

rusticbread

Easy Baked Flatbread

  • Servings: 8 flatbreads
  • Print

Ingredients

  • 250g plain flour
  • 1 tsp instant dried yeast
  • pinch salt
  • 1 tsp olive oil
  • 200ml plain sparkling water
  • olive oil spray
  • Salt for sprinkling on top

Directions

    Preheat the oven to 210C/410F
  1. In a bowl, mix together the flour, yeast, salt, and olive oil.
  2. Slowly pour in the sparkling water, mixing until a dough forms.
  3. Knead for approximately 5 minutes until smooth.
  4. Break the dough into eight pieces (half, and then half again)and roll each one into a large circle.
  5. Place on baking sheets – leaving space to rise – and spray with oil and sprinkle with salt.
  6. Bake for 8-10 minutes until golden brown and bubbling.


Pumpkin Spice Cake – VeganMoFo Day 2

Some may say it’s too early to be thinking about autumn and all things pumpkin, but I can definitely feel a chill in the air – and besides, when is it too early to be thinking of tasty food? This year, you can even get vegan pumpkin spice lattes at Starbucks in the UK, so what better choice for “emoji day” than the good old pumpkin?🎃🎃🎃

pumpkin2

I discovered recently that here in the UK you can buy canned pumpkin in Sainsbury’s for just £1! This was excellent news to me as often I’d tried making recipes that called for pumpkin puree by cooking and blending a pumpkin from scratch which is a bit of a hassle. Apparently this has been available for years but I never knew. At first, I wanted to make cookies, but I decided against that and went for spiced pumpkin cake bars!

pumpkin3

These are spiced with cinnamon, ginger, allspice, and cloves – and the canned pumpkin gives them a gorgeous texture. Sprinkled on top with a spiced sugar mixture they go perfectly with a mug of tea or coffee and will definitely give you autumnal feelings.

Pumpkin Spice Cake


Ingredients

  • 100g vegan butter (I used vitalite)
  • 150g pumpkin puree
  • 100g white sugar
  • 150g brown sugar
  • 1 tsp cinnamon
  • 0.5 tsp ground ginger
  • 0.5 tsp allspice
  • pinch ground cloves
  • 350g plain flour
  • 1 tsp baking powder
  • 0.5 tsp bicarbonate of soda
  • To top
  • 50g white sugar
  • pinch allspice
  • pinch cinnamon

Directions

    Preheat the oven to 175C/350F
  1. Begin by creaming the butter and sugars together.
  2. Mix in the pumpkin puree and spices.
  3. Stir through the flour, baking powder, and bicarbonate of soda to make a stiff mix.
  4. Press the mixture into a lined baking dish.
  5. Mix together the remaining white sugar, allspice, and cinnamon, and sprinkle evenly over the pumpkin mixture.
  6. Bake in the preheated oven until turning golden in colour.
  7. Cool in the tray, and then cut into squares.