Beetroot Risotto

Mmm, risotto. So versatile. You can have it in the spring, with asparagus and peas, in summer with courgette and lemon, in the autumn with squash and pumpkin, and finally winter with hearty root veg. What other food can be enjoyed year round?

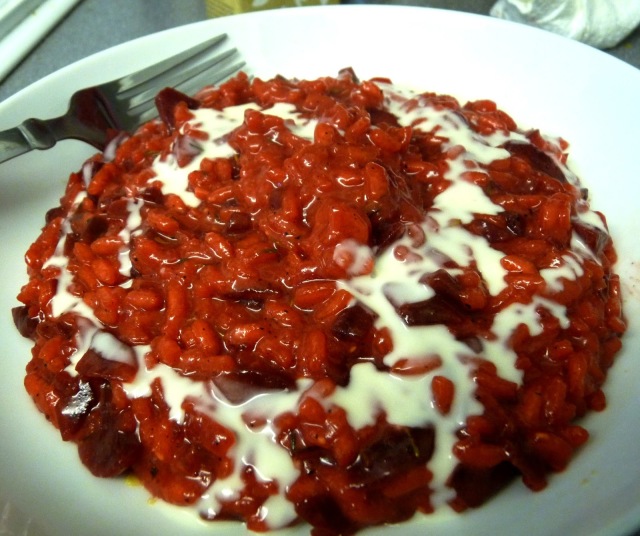
One of my favourite risottos is beetroot. Beetroot is such a cool vegetable. It’s so colourful! If you’re not careful, you can dye yourself pink! And the food you make with it becomes such a rich warm colour. I hear you can use it in desserts with chocolate, but I haven’t yet tried that. But a lovely creamy beetroot risotto just hits the spot.

This risotto is pretty simple to make. I start with ready-cooked beetroot, but if you have raw, just cook it through in the oven first. Chop it into bite sized pieces – the colour will leech into the whole risotto.

You have to stir, a lot. I find it quite relaxing actually. You put one scoop of stock in the pan, stir until it’s all absorbed, and repeat until the rice is cooked. It’s not hard work, it’s just something you can do and let yourself just chill for a while.

I like to add cream in my risotto – I use Oatly cream – but it’s not necessary. You could also add cream cheese or cashew cream if you have any.

(I use this)

Most non-vegan recipes use parmesan so I replaced this with nutritional yeast, but it’s ok to leave out if you can’t find it. I also fry in a mix of vegan butter and olive oil, but again, you can use just olive oil if you like.

Serve it on it’s own, or with some garlic bread.

Beetroot Risotto

Ingredients

  • 1 tbsp vegan butter
  • 1 tbsp olive oil
  • 100g cooked beetroot, diced
  • 1 onion, chopped
  • 1 clove garlic, chopped
  • 180g risotto rice
  • 1 litre vegetable stock
  • 1 tsp dried thyme
  • 1 heaped tbsp nutritional yeast
  • 50ml cream substitute

Directions

  1. In a large pan, melt the butter with the olive oil.
  2. Fry the onion and garlic in the pan until softened, then add the beetroot and rice.
  3. Fry the rice for 2-3 minutes until it starts to turn translucent.
  4. Add a ladelful of stock, and stir until the rice absorbs it all.
  5. Repeat until stock is used up and the rice is soft – about 25 minutes.
  6. Add the nutritional yeast and the cream and stir through.
  7. Serve with an extra drizzle of cream.

Strawberry & White Chocolate Cookies

It’s been a while.

That’s maybe an understatement. Okay, it is an understatement. The last recipe I blogged was a Christmas recipe last year. That’s…a long break. Plenty has happened – we moved to a new city, I’ve been busy with university…I guess I just didn’t get round to blogging any of it.

But now I am. I really want to get back ready for Vegan MoFo which is coming in September and I don’t want  to slack off anymore.

So I’m back, with a recipe just perfect for summer.

Now I don’t know about you,  but here, right now, the weather is certainly not summery. It’s raining. It’s grey. It’s a bit chilly. But that doesn’t mean I can’t at least pretend it’s summer weather. So, strawberries it is!

I used frozen strawberries in this recipe because I feel like they are easier to bake with. Fresh can get a little mushed up with all the stirring – and as you can see from my photos, these still didn’t hold their shape so well. You want to cut them fairly small – quarter them if they’re average size berries. I then do something that may seem slightly strange – I toss them with a couple tbsp of cornmeal. I think that cornmeal works really well in these cookies as it provides a texture and a slightly savoury flavour to the very sweet strawberries and white chocolate. Tossing the strawberries in it also helps them not stick together!

Cut them about this size

Then add cornmeal

The white chocolate I use is one that is sold quite widely here in the UK – you can buy it in most health food shops, and Tesco sell their own version in the free from section. However, if you have your own favourite type of vegan white chocolate you are welcome to use it, just break it up into “chunk” sized pieces (top tip, pulse it in a food processor for lazy chunks!). With the buttons, I just smashed them a few times with a rolling pin to get them a good size. Don’t worry about even sizing – who checks whether their chocolate chunks are even?!

These cookies do spread in the oven so make sure you don’t place them too close together. Use a tablespoon of mixture and not more – you don’t want them becoming too big.

Once cooked, you should leave to cool completely before putting them away as they are pretty fragile when warm. Keep in the fridge and eat quickly – the fresh strawberries mean these won’t last too long. But they taste good enough that that is never a problem!

Strawberry & White Chocolate Cookies

  • Servings: 25 cookies
  • Print

Ingredients

    – 350g frozen strawberries, quartered

  • 300g plain flour
  • 180g sugar
  • 200g butter substitute
  • 1 tbsp golden syrup (or agave/maple syrup)
  • 1 tsp vanilla extract
  • 50g white chocolate, broken into chunks
  • 1 tsp baking powder
  • 100ml almond milk (or whatever milk you use)
  • 2 tbsp cornmeal
  • Pinch salt

Directions

    PREHEAT THE OVEN TO 185C/356F

  1. Cream the butter and sugar in a large bowl until light and fluffy.
  2. Stir through the syrup and the vanilla extract.
  3. Add the flour and baking powder, and salt and mix well.
  4. Gradually stir through the milk.
  5. Add the white chocolate chunks and mix to evenly disperse.
  6. In a separate bowl, mix together the strawberries and the cornmeal until the strawberries are well coated.
  7. Add the strawberries to the cookie mixture and fold through. Be careful not to mix too much, or the strawberries will break apart.
  8. Place the mixture, 1 tbsp at a time, onto a lined baking tray. Make sure to leave space for the cookies to spread.
  9. Put in the preheated oven for 25-30 minutes, or until cookies are golden brown.
  10. Leave to cool completely on the tray, and then store in the fridge.