Brookies! – VeganMoFo Day 30

It’s the last day of VeganMoFo 2016! How sad is that? 😦 I really hope everyone has enjoyed it, and has found some great new vegan friends and recipes this month.

How apt that the final prompt for VeganMoFo this year is about giving. I love giving food as gifts and in fact did a huge order of food gifts for my family this past weekend. I made lots of my Millionaire’s Shortbread and lots of this recipe too.

brookies.jpg

Introducing brookies! They are a cross between brownies and cookies. I used my brownie recipe as inspiration – these cookies have melted chocolate in the batter which makes them lovely and fudgy – and adapted it into cookie form. And these might be the best cookie recipe I have ever come up with!

brookies2.jpg

These cookies only take 10 minutes to bake – don’t leave them in any longer or they’ll overbake – and are so deliciously gooey and chocolatey that they are a perfect food gift for any chocolate lover. They use aquafaba, which is liquid from a can of chickpeas – read about it in my carob cookies page – which works in place of eggs and keeps them holding together.

Brookies

  • Servings: Makes 22 Cookies
  • Print

Ingredients

  • 100g vegan plain chocolate, broken into squares
  • 40g cocoa powder
  • 1/2 tsp instant coffee powder (optional)
  • 75g vegan butter
  • 1 tsp vanilla extract
  • 1/2 tsp bicarbonate of soda
  • 2 tbsp milk of choice
  • 3 tbsp aquafaba
  • 225g white sugar
  • 200g plain flour
  • 75g chocolate chips

Directions

    Preheat your oven to 180C/355F
  1. In a heatproof bowl, combine the chocolate, cocoa, coffee, and butter. In a microwave, or over a double boiler, melt completely.
  2. Into the melted mixture, add the bicarbonate of soda, vanilla, and aquafaba, and mix well.
  3. Stir through the sugar until well combined.
  4. Add the flour to the mix and fold through until no pockets of flour remain. Add the milk if necessary to make a smooth but stiff dough.
  5. Finally, fold in the chocolate chips.
  6. Place tablespoon size balls on a baking tray – no need to flatten – leaving a space between as they will spread slightly.
  7. Bake in the oven for 10 minutes. They will look slightly underbaked but do not leave any longer!
  8. Leave to cool before eating.

Seitan Wellington – VeganMoFo Day 29

Seitan is one of those things that sound weird to non-vegans. You’re eating what for dinner?! But, once you get past the name, it’s actually really good. It’s very high in protein and extremely versatile – chop it up and use it in curries and stir fries, mould it into sausages or burgers, make slices to put in your sandwiches…and so on. It’s made from Vital Wheat Gluten, which is gluten (the protein) isolated from wheat flour. It used to be made by washing regular wheat flour over and over again to get rid of all the starch, which is a laborious process, but luckily today you can buy it in bags from your local health food shop. If they don’t have it in stock ask, they should be able to order it for you!

wellington2

For today’s VeganMoFo challenge, we are to do a “Holiday Test Run” and this year we have decided to make a Wellington. Not a pair of waterproof boots, but a roast wrapped in duxelles and puff pastry.

The centre of this wellington is a steamed seitan log, which is seasoned with rosemary and oregano, worcestershire sauce and soy sauce, onion and garlic powder, and more. Spread around that are “duxelles” which are finely chopped mushrooms sauteed with onion, garlic, and parsley.  Finally, wrap the whole thing in puff pastry, brush with melted vegan butter, and put in the oven.

wellington1

It bakes in the oven for 45-50 minutes – perfect timing for your roast potatoes – until lovely and golden brown and then can be sliced and served!

This recipe does take some time to do – as you need to make the seitan and cool it before assembling the wellington – but it’s well worth it. If you’re making it for your Christmas dinner you could make the seitan and the duxelles the day before, keep them in the fridge, and just assemble it all before you bake it. Easy!

Seitan Wellington

  • Servings: 6-8 slices
  • Print

Ingredients

    For the Seitan

    Dry Ingredients

  • 225g vital wheat gluten
  • 25g nutritional yeast
  • 1 tsp dried rosemary
  • 1 tsp dried oregano
  • 1 tsp garlic powder
  • 1 tsp onion powder
  • 1 tsp salt
  • few grinds black pepper
  • Wet Ingredients

  • 1 tbsp marmite (sub miso if you don’t have marmite)
  • 1 tbsp boiling water
  • 1 tbsp soy sauce
  • 1 tbsp vegan worcestershire sauce
  • 1 tbsp ketchup
  • 250ml water
  • For the Duxelles

  • 1 tbsp vegan butter
  • 1 onion, finely chopped
  • 2 cloves garlic, finely chopped
  • 350g mushrooms, finely chopped or pulsed to a mince in a food processor
  • 1 tsp dried parsley
  • 1 sheet vegan puff pastry
  • 1 tbsp vegan butter, melted, for brushing

Directions

  1. First, prepare your seitan. Get a steamer ready to use as it won’t take long to bring the ingredients together.
  2. Mix all the dry ingredients for the seitan together in a large bowl.
  3. In a separate bowl, combine the marmite and boiling water together and mix to a paste.
  4. Add the rest of the wet ingredients and whisk to combine.
  5. Slowly pour the wet ingredients into the dry ingredients and mix to form a dough. Knead for 3 minutes until springy.
  6. Form the dough into a rough log shape – about 2 inches in diameter – and place on a sheet of tin foil.
  7. Wrap the dough in the tinfoil like you would a Christmas cracker. Don’t worry about getting it too neat – just make sure it’s all enclosed – as the seitan will spring into shape whilst steaming.
  8. Place the wrapped seitan in your steamer and steam for 35 minutes.
  9. Remove the seitan from the foil and leave to cool completely.
  10. Next, make the duxelles. Begin by melting the butter in a frying pan and adding the onion and garlic.
  11. Fry those until translucent, and then add the mushrooms and parsley.
  12. Fry until the mushrooms have released all their liquid and it has cooked off – 15-20 minutes. You should be left with a paste-like mixture. Season to taste and leave to cool.
  13. Preheat your oven to 200C/400F
  14. Finally, assemble the wellington. Spread a layer of the duxelles on the puff pastry (the same length and width as your seitan).
  15. Place your seitan on top of the duxelles, and spread the rest of the mushrooms on top and on the sides of the seitan.
  16. Wrap the wellington in the puff pastry sheet and score the top to allow air to release.
  17. Brush with the melted vegan butter – this gives it the golden colour when baked.
  18. Place in your preheated oven for 45-50 minutes, until the pastry is crisp and golden.
  19. Serve with your preferred sides!

Mince Pie Cookies – VeganMoFo Day 28

It’s the final week of VeganMoFo 2016! Can you believe that? In just a few days it’ll be December, nearly Christmas. Are you feeling festive yet? Or are you a bit of a Scrooge and wish we’d all shut up about Christmas? Well, I’m firmly in the former camp. Christmas is great! If I have to put up with the cold rainy months I am going to enjoy Christmas as much as I can.

Mince pies are something traditionally Christmassy here in the UK. If you’re not familiar with them, they are a dessert – small individual pies filled with “mincemeat” which has no meat but is actually a stewed spiced fruit mix. You can buy it in jars here in most supermarkets (these days it’s almost always vegan) but if you can’t access it, you can make your own. I like to change things up a bit, so in the past I’ve made Mince Pie Cupcakes using mincemeat, and this year I made cookies!

mincepie.jpg

These are simple cookies to make, with added mincemeat and mixed spice. “Mixed Spice” is something that you can buy easily in jars here, but if you can’t, it’s a mix of cinnamon, nutmeg, allspice, cloves, and ginger. If you’re in America, you could sub pumpkin pie spice, which I believe is a very similar thing.

mincepie1.jpg

I like to chill the dough for these cookies in the fridge for half an hour before baking. This makes it easier to shape the cookies onto the baking tray, but you don’t need to do this step if you are impatient.

Mince Pie Cookies

  • Servings: 20 cookies
  • Print

Ingredients

  • 130g vegan butter (I use Vitalite)
  • 80g brown sugar
  • 150g mincemeat
  • 1 tsp mixed spice
  • 200g plain flour
  • 1 tsp baking powder
  • pinch salt

Directions

  1. Cream together the butter and sugar in a large bowl.
  2. Add the mincemeat and mix well to combine.
  3. Sift in the mixed spice, flour, baking powder, and salt, and fold gently to combine.
  4. Place the bowl of cookie dough in the fridge to chill for 30 minutes (or longer if you wish).
  5. Preheat the oven to 170C/340F
  6. Place tablespoon sized bits of dough on a baking tray, slightly apart from each other.
  7. Put the cookies in the oven for 12-15 minutes, until lightly golden brown.

Mushroom and Marmite Stew – VeganMoFo Day 27

For today, we’re challenged by VeganMoFo to talk about a food we used to hate, but don’t anymore.

Now, this can be a difficult one, because you have to swallow your pride and admit you changed your mind – not something most of us enjoy doing! But it’s for the best, because you get to eat more tasty food! I don’t know why it is, but sometimes if you try a food you didn’t used to like after a long time, it’s not so bad – even good! Maybe there’s a reason for this – your tastebuds changing or something – but I don’t know.

It happened to me with two things. Mushrooms, and Marmite. The slogan in the UK goes “You either love it or you hate it” with Marmite. I was never really in either camp – I didn’t find it repulsive, I just didn’t particularly enjoy it. It does have a fairly strong taste. Mushrooms, I just plain didn’t like. I still don’t think they smell very nice when they are cooking, but they taste good!

marmite1.jpg

So, to showcase food I changed my mind on, and to warm me up on these cold winter nights, I decided to make some Mushroom & Marmite Stew. It also has potatoes and butter beans in it, and I served it on toast because I think everything is better on toast, and it really is deliciously savoury and warming.

marmite2


I use dried herbs – sage and rosemary – in this recipe. In things like stews, dried herbs often work just as well or even better than fresh, because they hold up to the longer cooking time. Serve this recipe on a cold day and you will find it delightfully warm and cosy!

Mushroom & Marmite Stew


Ingredients

  • 2 small onions, sliced
  • 2 cloves garlic, chopped
  • 1 tbsp oil
  • 4 medium potatoes, in bitesize chunks
  • 500g mushrooms, quartered
  • 1 heaped tsp marmite
  • 1 can butterbeans, drained and rinsed
  • 1 tbsp balsamic vinegar
  • 1 tsp dried rosemary
  • 1 tsp dried sage

Directions

  1. In a large saucepan, fry the onion and garlic in the oil until softened.
  2. Add the marmite, dried herbs, and mushrooms, stir well, and cook for 5 minutes until the mushrooms begin to soften.
  3. Add the potatoes and water to just cover them, bring to the boil, and then cover and lower the heat to a simmer.
  4. Simmer for 15 minutes, then add the butter beans and balsamic vinegar.
  5. With the lid off, cook for a further five minutes.
  6. Check the potatoes for doneness, and taste for seasoning.
  7. Serve with toast, or in bowls with fresh bread!


Vegan Richa’s Indian Kitchen – VeganMoFo Day 26

Today for VeganMoFo we’re writing about our favourite cookbooks. Last year, I wrote about the Vegan Taste Of… series of cookbooks, but it was a tough choice between that and Vegan Richa’s Indian Kitchen. So this year I will write about Vegan Richa and her wonderful cookbook.

veganricha1

I got this book about a year and a half ago, but I’d been following the Vegan Richa blog for a lot longer. Let me tell you, I have never had a dud recipe from Richa. This is astounding as I’ve cooked a lot of her recipes and you’d expect at least one or two to not be to my taste. But no – even ones I wasn’t so sure about  from the name (like Mango Curry Tofu) were absolutely delicious. What follows are some of my photos of food I’ve made from the Vegan Richa book/blog.

veganricha2

Above is the “Seitan Makhani” from her book. This is essentially a vegan version of “Butter Chicken” and oh it’s so delicious. You can buy seitan or make your own – check out Isa’s recipe for a great one – and the dish is made beautifully creamy with cashews and non-dairy milk and lots of spices.

veganricha3

This, whilst perhaps not the best photo, is the “Chicken-Free Balti” which I used tofu for. It has vegetables, tomatoes, all in a simmered sauce that cooks down to be thick and beautiful.

veganricha

Finally – again, sorry for the poor quality picture – this is African Peanut Lentil Soup. This isn’t actually from the book, but rather from Vegan Richa’s blog. You can find the recipe here! Give it a go – it’s so delicious.

Not only is the book packed full with great recipes, but it’s a wonderful introduction to Indian cooking. If you’re already familiar with Indian cooking – don’t worry, it’s still got plenty for you – but it has in depth guides to spices, lentils, different ingredients that you may need to make Indian food. Including very helpful ingredients lists split into “Must have” “Good to have” and “Nice to have” ingredients – showing you which are essentials to buy, and which aren’t so much. This is great for those of us on a budget too.

Many of Vegan Richa’s recipes are on her blog – but the book comes with many many more that aren’t. It’s well worth buying – at just £11.99 on Amazon it is amazing value for money.

Creamy Tofu “Cheese” – VeganMoFo Day 25

My first vegan meal…well, I have no idea. I was brought up vegetarian and sort of stumbled into veganism, becoming dairy intolerant first and then realising there was no good reason to not be fully vegan. So I never had a “first vegan meal” – probably a lot of the meals I ate growing up were vegan anyway.

But an early memory of vegan food I have is cheese. When I stopped eating dairy, I thought that was it, I’d never be able to eat cheese again. However, I realised you could get vegan cheese. Wow! Dairy free cheese, what a winner! So I bought some. And tried it. And promptly spat it out. Yuck! Vegan cheese has not always been the violife/chao/etc that we have now.

Don’t worry, I am not going to recreate nasty cheese for this blog. What I am going to make is a nice, mild and creamy cheese that goes really well on pasta, soup, bread…all sorts of applications. In fact, it’s the cheese I used a few days ago on top of my spinach risotto!

tofucheese.jpg

And it’s really quite simple to make. Just tofu, blended together with nutritional yeast, vegetable stock powder, onion and garlic powder, lemon juice, olive oil, and a tiny amount of vinegar.

tofucheese3.jpg

You then tie it in cheesecloth, or a tea-towel, and leave it to drain over a bowl overnight. This firms the cheese up and lets it hold its shape.

I then like to bake the cheese, which firms it up even more and gives a nice crust, but you could use it as a cream cheese just as it is!


This cheese recipe is SO versatile. You can adapt it however you want. Add herbs to make a herby boursin like cheese. Add chillis and smoked paprika for a Mexican style cheese. Add olives if you like! Or just have it as it is.

Creamy Tofu Cheese

  • Servings: 1 cheese block
  • Print

Ingredients

  • 300g tofu, drained
  • 1 tbsp nutritional yeast
  • 1/2 tsp vegetable bouillon powder
  • 1/2 tsp onion powder
  • 1/2 tsp garlic powder
  • 1 tbsp olive oil
  • 3 tbsp lemon juice
  • 1/2 tsp cider vinegar
  • 1 tsp salt

Directions

  1. Place all the ingredients in the bowl of a food processor and blend. Scrape down the sides and blend again, until a smooth mixture is formed.
  2. Pour the mixture onto a cheesecloth or (clean) tea towel. Pull the ends together to form a little parcel, and place in a sieve over a bowl.
  3. Leave in the fridge overnight to drain.
  4. Next, remove the cheese from the cloth. It should be much firmer now!
  5. You can either have the cheese as it is, or bake it.
  6. If you wish to bake it, heat your oven to 175C/350F and bake the cheese for 40 minutes. Cool before eating!

Thanksgiving Pasta – VeganMoFo Day 24

Happy thanksgiving to all the Americans out there! I’m not American, so I had to think a little when it came to finding a thanksgiving inspired meal for today’s VeganMoFo prompt.

It seems that many of the ingredients used in American thanksgiving meals are similar to what we Brits use in Christmas dinners. With a few exceptions like sweet potatoes (and marshmallows?), and nuts like pecans.

I decided to go with what I know – brussels sprouts and cranberries – and add in some American elements – sweet potatoes and pecans. I’m afraid I wasn’t quite brave enough to put marshmallows in my meal.

thanksgiving3.jpg

Rather than doing a big roast, I made pasta! It may not be a traditional thanksgiving meal, but then as a Brit I am not a traditional thanksgiving celebrator. It tasted really good!

thanksgiving2.jpg

The meal itself is pretty simple – just roast the veg, toast the pecans, and cook the pasta. Then stir together the vegetables and pasta, and top with the toasted pecans. So much easier than a full roast dinner!

thanksgiving1.jpg

I also topped my pasta with some of the Sainsbury’s vegan Wensleydale & Cranberries, feeling that this was an appropriate usage of a cheese I wasn’t really sure what to do with. It worked well – so if you have any cheese like this, give it a go.

Thanksgiving Pasta with Sweet Potatoes, Brussels Sprouts, Cranberries and Pecans


Ingredients

  • 3 sweet potatoes, cubed
  • 250g brussels sprouts, halved
  • 2 tbsp olive oil
  • 30g cranberries
  • 250g dried pasta
  • 1 tbsp vegan butter
  • 60g pecans, chopped
  • Salt & Pepper

Directions

    Preheat your oven to 200C/400F
  1. Toss the sweet potatoes and brussels sprouts in the salt and pepper and olive oil, and place on a baking tray (or two if needed).
  2. Place in the preheated oven for 30 minutes.
  3. After 30 minutes, add the cranberries, stir, and return to the oven for a further 15 minutes.
  4. Meanwhile, cook the pasta.
  5. Next, in a frying pan, melt the vegan butter, and add the chopped pecans.
  6. Fry until the pecans are fragrant and crisp – 5-10 minutes.
  7. Once the pasta and vegetables are done, drain the pasta and return to the saucepan.
  8. Stir through the roasted vegetables until well mixed.
  9. Serve topped with the toasted pecans!

Cheese and Onion Pasties – VeganMoFo Day 23

Today in VeganMoFo we’re challenged to show what seasonal food we make. It’s well and truly autumn/winter here, this week has been cold and rainy and really quite horrible. Seasonal vegetables – such as butternut squash, beetroot, swede – are all very well but sometimes you just want some cosy food.

Enter, pasties! Crisp pastry wrapped around a warm, melt in your mouth filling. What could be better?

pasty2

Look, I even served it with vegetables (broad beans and peas) so it’s healthy! Perfect kinda meal, right?

This pasty has the best kind of filling: cheese and onion! This was my husband’s request, as he used to enjoy the cheese and onion pasties you could get before he was vegan. I thought I’d see if I could make it vegan and – I could, easily. I used Violife cheese, but use whatever you like, just make sure it is a cheese that actually melts!

pasty6.jpg

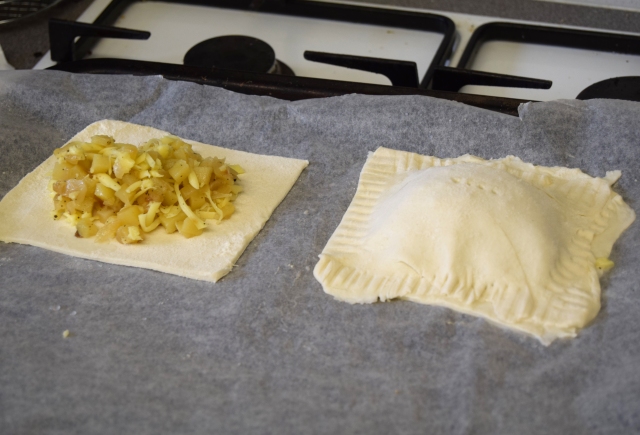
The first step is to fry the onions and potatoes. The potatoes are diced very small, so they cook slightly in the pan and then can finish cooking completely in the pasties. If they’re cut too large, they won’t cook through.

pasty5

Then, once cooled, the potato onion mixture goes in a bowl with the grated cheese and seasoning. I used a food processor attachment to grate my cheese because I find it annoying grating so much by hand, but it can be done by hand if you don’t have a food processor.

pasty4

Next, the pastry gets rolled out and filled with the potato-onion-cheese mixture. Make this generous as the pastry will puff up and you don’t want an empty pasty!

pasty3

Finally, the pasties are baked in the oven for thirty minutes until lovely and golden brown! You can serve them how you like – on their own, with vegetables, in your packed lunch…however. Hot or cold, they’re lovely comfort food.

Cheese and Onion Pasties


Ingredients

  • 1 tbsp vegan butter
  • 1 large onion, diced
  • 325g potatoes, peeled and diced small (1cm cubes roughly)
  • 150g vegan cheese (I used Violife), grated
  • Salt & Pepper
  • 450g puff pastry
  • 2 tbsp vegan butter, melted (for brushing on top of the pasties)

Directions

  1. Melt the tablespoon of vegan butter in a large pan.
  2. Add the onion and fry for 5 minutes until the onion is translucent.
  3. Add the potato cubes and a slosh of water and fry for a further 5 minutes, adding more water if it starts to stick to the bottom.
  4. Remove from the heat, place in a large bowl, and leave to cool.
  5. Preheat your oven to 180C/355F
  6. Once cool, mix in the grated cheese and the seasonings.
  7. Next, roll out your puff pastry. Cut it into small rectangles – about A5 size – place on a baking tray, and place a big scoop of the potato filling on top of half of your rectangles.
  8. Top the pasties with the other half of the rolled out pastry. Seal the sides by brushing with a little water and squishing together with the tines of a fork. Push the fork into the top of the pastry to create a hole to allow steam to escape.
  9. Brush the pasties with the melted butter – this gives them a lovely golden colour once cooked.
  10. Bake in your preheated oven for 30 minutes, or until golden brown and crispy.
  11. Can be eaten hot or cold.

VeganMoFo Day 22 – Food Flops

Today’s prompt is “Silly Food” and while I couldn’t really think of anything silly that I eat, I thought I’d show a different side to being a food blogger. Now, I certainly don’t claim to be the best blogger – nowhere near – and my photos aren’t professionally done, but I can just about make my food look good. Sometimes though, that can make it seem like it’s effortless getting great looking food. Look on instagram at all the beautiful meals everyone eats…and then look down at your plate, and wonder what happened?

Well, it’s not true. My food doesn’t look any better than anyone else’s – I just take lots of photos and learn to arrange my food in pretty ways! I don’t go to the extremes that some do – I know of food bloggers who will photograph their dinners cold, so as to avoid steam, but who has time for that?

For today’s “silly food” prompt, I thought I’d share with you some of my less pretty food photography, my food mishaps, examples to demonstrate just how silly food photos can be!

DSC_0382.JPG

Let’s start with one I call “How on earth do they do this?!”. This is from when I made Millionaire’s Shortbread and I was beating the fudge topping after cooking. I thought I’d take a photo to show how it is done. I forgot I only have two hands. At this point, the fudge was thick, the saucepan was sliding all over the counter, and I was also trying to take a photo with my camera. Beautiful, right?

DSC_0587.JPG

Here we have “Forgetting about the Blinds”. I could claim the stripes in this photo are trendy, some new light source thing, but really, it’s because I have slatted blinds in my kitchen and I forgot to pull them up before taking the photo. This is from my Banana Muffins, which were tasty and not actually stripey.

dsc_0595

Here is a gross looking one for you. This is my Gooey Cheese Sauce in the making and doesn’t it look delicious? Ok, no it doesnt’. It looks gross. But actually, it’s one of my favourite cheesey sauce recipes, and when I was writing it up for the blog I tried to do a step by step. That didn’t work because it just looked icky in the making. That there is tofu, nooch, garlic, and broth, which gets blended and turns out much nicer.

DSC_0951.JPG

Here is one called “I hate this bowl”. This is my Borlotti Bean Soup which is so easy and so tasty. I was given these cute bowls that say “soup” on them (with plates that say “bread”) on them for Christmas. And I was so excited – they’re adorable and surely now I can make pretty soup pictures for my blog! Not so fast, girl. They’re black bowls, very black bowls, and my camera does not like that. It turns out that I can get a great picture of the bowl and never a great picture of what’s inside the bowl…

DSC_0950 (3).JPG

Here is one called “All The Steam”. Your camera, you see, like any other bit of glass, will steam up when going from somewhere cold (the living room) to somewhere hot and humid (the kitchen). When I grabbed my camera from the arctic temperatures in the living room to snap these Pea and Courgette Fritters, I ended up looking like I’d photographed them in the fog. Not a great look.

P1220650.JPG

And we make so much mess. Food is messy, especially when you’re baking, especially when it’s chocolate. These Peanut Butter Cups were lovely but not exactly tidy. Chocolate is a nuisance to wash up too, and you can see it all over my bowl in the corner of this picture! Bonus camera strap also hanging around.

P1220736.JPG

Finally, here’s an all round terrible photo of my samosas. It’s blurry, for one. The counter is dirty, with bits of samosa crumb and flour on top. My feet are in the picture! As is my kettle, my salt, my kitchen scales, and half the cooker. Bonus for the oily kitchen roll under the samosas.

Now, none of the food in this post tasted bad. In fact, it all tasted really rather good. Sometimes, it can be hard to see past ugly looking food and feel bad that yours isn’t quite pretty enough. But I hope this shows that food can look however it likes and still be pretty amazing tasting!


Cherry and Almond Loaf Cake – VeganMoFo day 21

Three weeks of VeganMoFo down! We’re into the final weeks of November now – how strange is that? Christmas is nearing (but not yet) and it’s definitely getting very cold.

This week in VeganMoFo is Memories and Traditions week. This will incorporate American Thanksgiving but also involves all sorts of food memories and experiences! Today’s prompt is “Your favourite food memory” which is hard because – so many!

It had to be dessert, because I have a massive sweet tooth. Something baked too, because I love baking. And thinking back to times I’ve had good memories about baked goods…I came to my Granny’s house, where she always had cake. She lives in a little village and they are very…village-y, and she would always have cakes she bought from the local WI (Women’s Institute). My absolute favourite cake was the cherry and almond loaf cake – a golden cake with an almondy hit and sweet glace cherries through it.

cherrycake2

So, I made it. Mine isn’t quite as pretty as the WI version – my slivered almonds on top seemed to migrate to the middle – but it tastes just as good!

cherrycake3

Baked in a loaf tin, this cake slices well and is lovely with a warm cup of tea (or coffee if you must). The glace cherries are rinsed and chopped into quarters – this is to stop them sinking – and it all bakes until lovely and golden brown.

Cherry & Almond Loaf Cake


Ingredients

  • 250ml almond milk
  • 1 tbsp lemon juice
  • 160g plain flour
  • 80g ground almonds
  • 1/2 tsp baking powder
  • 1/2 tsp bicarbonate of soda
  • pinch salt
  • 75g glace cherries, rinsed and quartered
  • 1 tsp vanilla
  • 1/2 tsp almond essence
  • 80g vegan butter, melted
  • 130g sugar
  • 10g slivered almonds

Directions

    Preheat the oven to 170C/340F
  1. In a jug or bowl, combine the almond milk and lemon juice, and set aside to let curdle.
  2. In a large bowl, mix together the flour, ground almonds, baking powder, bicarbonate, and salt.
  3. To the dry bowl, add the glace cherries, and toss to coat.
  4. Into the almond milk mixture, add the vanilla, almond essence, melted butter, and sugar, and whisk to combine.
  5. Slowly pour the wet mixture into the dry mixture, and gently stir until all combined.
  6. Pour into a lined loaf tin, and sprinkle on top with the slivered almonds.
  7. Bake in the oven for 40 minutes, or until a skewer inserted in the middle comes out clean!
  8. Cool in the tin, and slice and serve!